Pages - Menu

Thursday, 28 February 2013

CC&S - Challenge #14 - Sketch

Hi there! Jacqueline has a corker of a sketch for you this week over at CAS - Colours and Sketches!
I can't wait to see what you come up with!
Here is the sketch -
Now, I must admit this had me stumped for quite some time and I had just too many different ideas for this one. So, I sat down and really stripped back those ideas and went with a very basic design. At the end of it, I loved it.
Here is my DT card -
I tried a new technique called Ghost Stamping. This is a great technique for light or dark Kraft paper. I used my Mixed Bunch stamp and inked it up with Whisper White and just stamped directly onto my cardstock. I then inked it up with Rose Red and stamped over the top but just off centre a little. I think it has turned out really pretty.
I wanted a very simple sentiment as I didn't want to take any thunder from my pretty flowers. Stamped with Whisper White and is from my Friendly Phrases set.
Now! I cannot wait to see how you interpret this sketch. You will love the inspiration from the other DT members as well so make sure you check them out.
Thanks for looking xx


Wednesday, 27 February 2013

Inkspirational Sketch Challenge

Hi there and welcome to the newest challenge over at Inkspirational.
 
We have a sketch for you this week -


And here is my DT card for this sketch -


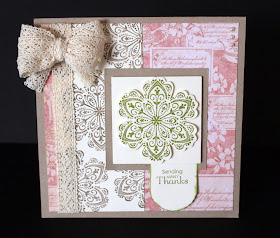
I have used a new set called Mixed Bunch and stamped with Soft Suede and Old Olive. The banner with the sentiment is has been cut with my Hearts a Flutter Framelits . The sentiment is from my Petite Pairs set. I used my Blossom punch so I could pop up one of the flowers in the centre panel.
 
I have named my new bow tying contraption my - Bow-a-ma-jig which I used to create the bow from the Victorian Lace.
 
We are sponsored by
 
{Freebies}
 
 
We can't wait to see what you come up with this week. Don't forget it is the final week that you will need to play to be eligible for a prize. Full details are on the challenge blog.
 
Thanks for looking xx


Addicted to STAMPS!!!!

Hi everyone! We have a great challenge over at Addicted to Stamps and More! today. You may create anything you like as long as you use STAMPS!
 
We have an amazing sponsor again this week - we welcome the return of
 
Inspired by Stamping
 
Now onto my card -
 
 
I decided that when you have a challenge to use your stamps, what do you do? You make your own DP of course!
 
I have stamped my flower onto two separate pieces of cardstock. One with Certainly Celery and then one with Pretty in Pink. I have then stamped another flower and cut it out and inked around the edges.
 
The triple bow is courtesy of a tutorial provided by our sponsor, Joanna at Inspired by Stamping. As soon as I saw the video I dragged my dad to garage to put together my own contraption. If you have a look, you will see what I mean ;) I decided to be creative and use TWO ribbons at the same time. THANK YOU, Joanna (and dad), you are my hero(es)!!
 
Inspired by Stamping sets used -
Halloween Tags - good all year round!!
 
I really love these colours together - very feminine.
 
I hope you can make it over to the challenge at ATSM! We would love to see you there. Hop over and check out the amazing DT and their creations.
 
Thanks for looking xx


Monday, 25 February 2013

WHW #90 - Stationery

Well, funny enough it's raining AGAIN!
I have finally got the chance that I needed to create my own stationery. I have followed the tutorial by Cindy Coutts over at Inspired by Stamping.
This was really fun and I found how easy it was to mass produce. And when you are into CAS like I am, it makes it even easier. I really wanted to achieve a nice elegant set of paper and envelopes.
I must warn you, though, that the photography is terrible for this project! I apologise in advance.
Here is one set that I have made -

The cardstock is my Naturals White and Patterns DSP from Stampin Up.
I have used a sentiment from Paper Smooches and the swirl is from my Inspired by Stamping set called Elegant Christmas Sentiments.

Here is the stationery folded out -


The envelope -

The stamp on the front is from my Apothecary Set and was perfect for writing the address on!


I have used a circle stamp from a set by Inspired by Stamping called Halloween Tags
The 'Kylie' stamp is one that says a lot more but I just used a marker to ink up my name


And her is the little set that I made -

The second writing paper has the word "Friends" which is a stamp by Inspired by Stamping and is from my Elegant Sentiments set


Thank you Cindy for the wonderful tutorial - well done! I am going to be making more of these as I write to my little neices interstate and they will LOVE these!

Thanks for looking xx


Saturday, 23 February 2013

Inkspirational Challenge #8 {CASE}

Hi everyone!
It's time for a little End of the Week Encouragement over at Inkspirational! Our current challenge is half way through and I hope I can inspire you to join in the fun.
We have a CASE for you this week which comes from the amazingly talented Vicky Hayes.
Here is her card -


Original design by Vicky Hayes HERE.
And here is my DT take on this CASE
I was inspired by having a central focal point and the simple layers of the card.
I felt the black and white with the glittery butterfly was all that was needed. No sentiment for this one. I have embossed the top panel with my Retro Swirls folder to frame my die cut butterfly.
Well! I hope I may have inspired you to take part in this wonderful challenge that is sponsored this month by
{Freebies}
Thanks so much for looking xx


ATCAS #7 - Code Word Masculine

How exciting, a new code word over at Addicted to CAS!
Our new challenge is hosted by the wonderful Sue! Sue has chosen a great code word for us this fortnight.
This is a wonderful oppotunity for you to make those 'boy' cards. Just remember to keep it CAS!
Here is my DT card -
I have used new cardstock from Stampin' Up which is Naturals White. It has a lovely natural fleck through the paper which was perfect for a masculine card.
I used the banner die from my Hearts a Flutter Framelits on Basic Black cardstock.
The faux stitching was a last minute addition and I really like the way it defined the panel with the sentiment and the banners to create a better focal point.
I have used a circle punch to chop off the corners.
The sentiment is from Paper Smooches.
We have the wonderful Andrea from Annabelle Stamps joining us as a Guest Designer and sponsor.
There is a $10 gift voucher to be won by playing along with this challenge!
Now, head on over to the challenge blog and check out all the inspiration for this code word! You wont be disappointed!
Thanks so much for looking xx


Thursday, 21 February 2013

CAS - Colours and Sketches Challenge #13

Hi there! We have a colour challenge for you this week at CAS - Colours and Sketches!

Don't forget that you don't have to use Stampin' Up colours - just the closet colours in your stash that you can find. Also, make sure that your card incorporates a stamp.


I have used Tangerine Tango and Sahara Sand cardstock and then ribbon for Summer Starfruit.

Here is my DT card for this challenge -


I have embossed the top panel with only half of my Vintage Wallpaper folder and then popped up with foam pads.

I have made the flower using a running thread through the edge of the ribbon leaving the ends loose. Once finished, I just drew the edges of the ribbon together and shaped my flower. I have used an antique brad in the middle. Not TOO shabby for someone who struggles just to thread the needle lol.

My sentiment is a new set I have from Paper Smooches and has been popped up on dimensionals.

I hope to see you join in the fun this week!

Thanks for looking! xx

Wednesday, 20 February 2013

ATSM - Vintage!

Good morning. We have a new challenge over at Addicted to Stamps and More! and the theme is

VINTAGE

We are so lucky to be sponsored this week by Inspired by Stamping. Joanna has generously provided a $20 gift voucher for our Top Addict to use at her store!

Now, Vintage, is something I don't really 'do' but that's what these challenges are all about!

Here is my DT card and you can decide :)


The hardest thing for me to do with cardmaking is layers. I am pretty much more CAS-inclined. I really enjoyed making this though - it pushed me to think of 'what else can I add to this card'?

In a nutshell - I have stamped a new stamp called Vintage Love with Versamark ink and clear embossed. The music sheet is also a new stamp and it is inked with Vintage Photo. The DP is from a pad that uses all vintage type styles.

The sentiment is from Inspired by Stamping (our sponsor) and is from the Fancy Sentiments set. The little charm is from Stampin Up. Now, the green 'flower' that you see is my first attempt at trying to make my own flower out of ribbon. This entailed using a running stitch and with the loose ends, pull the ribbon together and manipulate it into the shape you like. This one didn't 'quite' work but I couldn't bring myself not to use it for something. I have popped an antique brad in the centre. Considering I don't sew, I wasn't too unhappy with it ;)

So, that's about it! I hope it is Vintage enough for your liking and will inspire you to play along :)

Hope on over to Addicted to Stamps and More! and check out what the DT have in store for you.

Tuesday, 19 February 2013

I miss you

Hi there! Today I have made a card for my son.

I have been stuffing cards into envelopes preparing them to be posted tomorrow (some are a little late - whoops) and I decided that while I'm off to the Post Office, I would put something together for my boy (who is 18) as he moved interstate last month. 

I hope he doesn't think this is a little 'boyish' but I had fun making it and he BETTER like it!! ;)


I used my Simply Scored to create a border. The stamp is from my Aint Love Grand set that has never been inked up! I have paper pieced the plane and banner.

I also got to play with my new Puffy Cloud dies. I have cut them three times and glued them together to give them more dimension. The whole panel has been popped up onto dimensionals.

I am entering this card into the following challenges -

Less Is More - Up in the Air
Created with Love Challenges - Things that Fly

Thanks for looking xx


Monday, 18 February 2013

I LOVE Christmas (don't we all?)

Hi and welcome to a wonderful sunny.... whoops, nope! It's pouring AGAIN!
Oh my... and off to the craft room we go....

So! I wanted to create a card for the next challenge over at 52CC Throwdown. Those girls are pushing me with their challenges at the moment and I am LOVING it!

I certainly was able to be a bit more creative than usual with this card. 

Firstly I created my own DP by stamping with a snow stamp all over a piece of Whisper White card and mounted onto Crumb Cake.

I then used my double petal punch on red cardstock and then chopped off two of the petals to create a heart. 

I have used my Penguin out of my Punch Pal set, coloured him in with Stampin' Write markers and cut him out.

He's so cute!


Then I got REALLY creative (well, for me anyway..) and used two different stamps for the sentiment. I coloured the 'i' out of the 'christmas' with my Basic Black Stampin' Write marker. The 'Love' is from my Loads of Love set. Using my stamp-a-ma-jig I was able to position them where I wanted them.

I have used my Cherry Cobble baker's twine to hold a little heart gem.

Check out the challenge - you will love it!


Thanks for looking xx


Saturday, 16 February 2013

"Heart" it is!

Hi! I hope you are enjoying your weekend!
I'm having a very quiet day doing housework, mucking around and playing with my goodies.
I have squeaked in for the challenge over at Casology where the cue word is
I had lots of ideas for this cue word because Red reminds me of so many things!
Roses, Christmas, Love, Hearts, my best friend (her favourite colour is red), Flowers or even Fast Cars ;)
I ended up choosing Hearts which was a bit of a challenge itself as I don't have much in my stash that I can use. I then remembered that I have my double petal punch!! Once punched, I can cut off two of the sides and I will have a heart!
Here is my card -
I love using this colour combination - Crumb cake (Kraft), Very Vanilla and Real Red.
The sentiment is from my Whimsical Words set.

I would also like to enter my card into these wonderful challenges -

Crafting by Designs - Here's my Heart
Moving Along With the Times - Love is in the Air
Penny's Challenges - Use your favourite colour combo
Thanks so much for looking xx


Thursday, 14 February 2013

CAS - Colours and Sketches Challenge #12

Jacqueline has provided us with another wonderful sketch for this week's challenge over at CAS - Colours and Sketches!

As soon as I saw this sketch, I really wanted to create something masculine. Sometimes flowers, butterflies and ribbon just need to be put aside lol.

Here is the sketch to inspire you -


And here is my DT card -


My colours have changed just a little in this photo. I have used Very Vanilla cardstock for this one but it appears more like white. The DP I have used is from a 6x6 stack called Assemblage.

I love this stamp set - it is called The Open Sea and is just so versatile.
I have used every single stamp in the set.

The inks I have used are Sahara Sand, Chocolate Chip, Not Quite Navy and Creamy Caramel.

The senitment is from my Petite Pairs set. I have used my nifty little trick, again, of using my small circle punch to cut the corners off one of the panels.

Check out the rest of the DT as they will blow you away!!!

Thanks for lookin! xx


Wednesday, 13 February 2013

Getting Inkspirational with a photo

Hi everyone! It is that time again when we present you with a new challenge over at 

This week we have Challenge #7 coming your way with a Photo!


Now, I have taken inspiraiton, not only from this photo but from one of my dear blogging friends and one of her beautiful cards. Loll's card inspired me to go out and buy some dies (no thanks to my bank account, Loll...) and give them a whirl. I was dying to try out the window and window box.

So, with the photo inkspiration we have for this week's challenge, what a better time than now?

Here is my DT card -


I have cut the window die from Poppy Stamps, out about 4 times to give it extra dimension (great tip Loll) and cut out the window box just a couple of times. 

I used my Itty Bitty stamps and co-ordinating punch set. I actually stuck them to a little piece of acetate so I could get my blooms above the window a little more. The little leaves are from my Lovely as a Tree set.

No sentiment for this one as I knew I could use this card for something special down the track - just don't know what yet lol.
I'm actually a little annoyed that I inked up the edge of my panel. I don't like it, lol.

We are sponsored this month by

{Freebies}

and they are offering a $30 gift voucher to their digital store!

Now it's your turn to get in on the Inkspiration!!!

Thanks for looking xx


52 CC Throwdown - Colour Challenge

Hi there!!
This was a REAL challenge with these colours over at 52 {Christmas} Card Throwdown this week. I love non-traditional colours but I was so unsure about this.
With no real plan, I sat down last night and started to give it a go. I had all sorts of different ideas but I am fairly happy with how it all ended up.
The DP I have used are from Stampin' Up and a 6x6 pad called 'Home for Christmas'.
The stamp is from my Ornament Keepsake set and inked up with Chocolate Chip. The sentiment and little flourishes are from Inspired by Stamping and also inked with Chocolate Chip. With the colours being so 'warm and cosy' I thought the Warm Wishes was extra nice.
I have created the shaped panels by using my Circle punch from my Itty Bitty set and chopping off a bit of the corners.
Here is the colour inspiration for you - (which I am very inclined to love now)
Head on over and check out the wonderful inspiration from the DT!
Thanks for looking xx


ATSM - BINGO!!!

Time for our Bingo Challenge over at Addicted to Stamps and More!
There are some really cool options on this week's card! Check it out!


I have chosen the line Digi / Glitter / Paper piece for my DT card this week.


I have used a digi from our sponsor over at 

Clear Dollar Stamps - the leading source for affordable clear acrylic stamps for scrap booking and creative paper crafts


These digi sets are awesome as there is so much for so little $$. In this particular pack, you get all different digs (coloured and non-coloured), matching paper and super cool sentiments.

This one is called 'Tiny Dinos' and you can find him HERE

So, I have made this little fella quite bright with the paper piecing. I have glittered up his scales and added the googly eyes for a really fun card. He's soooo cute!

Now head on over and join in the BINGO FUN at Addicted to Stamps and More!

Thanks for looking! xx


Sunday, 10 February 2013

Liebster Award!


Well! I am so chuffed about this, thank you so much Sue!!!

I had no idea that an award like this even existed but what a great idea!

ABOUT THE AWARD This award was designed to be a blog award in the pay it forward fashion. Once you've been nominated, you award it to blogs that you like that have fewer than 200 followers, to encourage new visitors to visit these new blogs. 

RULES FOR ACCEPTANCE
Thank the person who gave you the award and link back to their blog. Post the award onto your blog. Give the award to five bloggers who you appreciate that have fewer than 200 followers. Leave a comment on their blog letting them know that you have given them this awesome award!


PAY IT FORWARD 
Here are five awesome blogs that I think you should check out:

Apart from being a wonderful person, Sandie is really coming into her own. She is on two DT's with me and I love seeing what she creates!

Louise and I are also on the DT at CAS - Colours and Sketches and I love seeing what she comes up with each week. 

Danielle has a wonderful style that I know you will love. I loved it so much that I had to ask her to join my team at Addicted to Stamps and More! 

Jacqueline has been with me from the very beginning over at Addicted to Stamps and More! Actually, she was my very first DT member to join! This woman works so hard with all the challenge blogs she is involved with and has recently become a Stampin' Up! Demonstrator. Check her out!

Christine's flair for CAS is just amazing! This is one talented lady! I knew she has to be on my team at Addicted to CAS. I love Christine's humour with her cardmaking as well.

There you have it. Thanks again to Sue for nominating me for the award and I hope you will check out the ladies that I have nominated!

See you soon xx


Inspired by Stamping #45

Hi everyone!

When I saw the colour challenge at Inspired by Stamping, I just knew I wanted to make a card and try a brand new technique from my Online Card Classes.

As this is my first attempt at using acetate on a card, I got it all a bit messy with glue etc. Oh well - try, try again. But seeing this was my first attempt and it took me FOREVER to make, I must post it.


I started with Very Vanilla cardstock and decided to use my scalloped circle dies from Spellbinder. I used a medium size die to first cut out a portion of the front of the card. I then used two dies to create the 'outline' and used the bigger die to create the acetate window. 
I embossed the card with my Vintage Wallpaper folder.

The sentiment is from my Fancy Sentiments set (Inspired by Stamping) and I have used the Victorian Lace and flowers that are also from Inspired by Stamping.

Here is the colour inspiration -

IBSIC#45

I don't have anything 'heart-like' in my stash!! I must remedy that. But I took inspiration from the colours and the theme of love. 

Thanks so much for looking xx


Saturday, 9 February 2013

Inkspiration - Colour Challenge

Happy Saturday everyone!
I'm here to hopefully inspire you to join in the fun at Inkspirational Challenges.
We are halfway through this challenge, so this is your end of the week encouragement.
Here are the colours we would like you to work with -
Here is my card -
My colours have turned out a lot lighter in this photo. In real life they are nearly exactly the colours provided.
I have used the Window die technique again. The flower is from my Growing Green set - stamped with Versamark and embossed with black powder. I have coloured it in using Not Quite Navy.
I used my Frame punch for the sentiment which is from my Petite Pairs set.
I hope you can join us this week - head on over an check out all the inkspiration from the DT!
Thanks for looking xx

ATCAS #6 Code Word Candy

Hi there everyone! Yep it's time for a new challenge over at ATCAS which means a new code word.

Shana is our host this week and she has chosen 


Now, this was difficult for me as we don't use this word at all in Australia!

Whoops, I tell a lie - we use it when checking out a good looking bloke and say 'Ooooo, he's a bit of eye candy!!'. LOL. Bugger, I should have created a calendar and shown off Mr February!!!

Anyway, my point being (if you are still with me) is that we don't use this word for what it is intended, lol. I have used a digital stamp for my DT card and cut out individual 'candies' and popped them up on foam squares. I have used the red and pink colour combo for the sake of Valentine's day. 


The markers I used were Real Red and Regal Rose.
The sentiment is two stamps from an Inspired by Stamping set that I have placed on my acrylic block and stamped together.

We have Beverley from Uniko Studios joining us again as our sponsor and guest designer! She is offering an ultra cool prize!!


You have to be in it to win it so get cracking with you 'candy' or  'eye candy' creations!

Please hop over to Addicted to CAS and check out what the DT have come up with for your inspiration!

Friday, 8 February 2013

Gift Card Holder

Hi there everyone, happy Friday!

Today I have made a little gift card holder that will be for my brother's birthday. Instead of making a 'normal' card, I thought this would be fun.

I had watched a video from my Online Card Class showing partial die cutting and decided to give it a go. These are just way too easy and I will certainly be making more of these. 


I used my Spellbinders square die (the largest one) to create a small folded panel. I then covered it with First Edition paper and used a small round punch to cut the bottom corners. I tried to keep the colours very masculine (and then I go and pop a flower with a gem on top....). Anyway, I'm sure my brother wont mind the flower lol. The twine was a freebie I received with an order from ebay!

The Happy Birthday is from my Sassy Salutations set and stamped in Old Olive.

So as you can see, when you lift the flap, there is a spot for you to place a gift card. To create the smaller flap to hold the card, I used my smallest die in the Framelit labels collection and only allowed part of the die to cut through the paper by not pushing it through the Big shot too much.


I was going to decorate the inside a little more but then remembered it is for my brother and I will just use that white space to write a personal message.

I would like to enter my gift card holder into the following challenges -

Papertake Weekly - Anything Goes
Crafty Sentiments - Anything Goes
Sarah Hurley Challenge #77 - Anything but a Card

Thanks so much for looking xx

Thursday, 7 February 2013

CAS - Colours and Sketches #10

Yay!! Another challenge to inspire you over at CAS - Colours and Sketches!
This week is a colour challenge and I LOVE these colours!!
I needed to make my sister a birthday card which is in a couple of weeks. I had a couple of new goodies that I really wanted to use and a new technique that I had learnt from my Online Card Class.
Here is my card -
Cardstock first - Very Vanilla, Crumb cake and Perfect Plum.
The plum panel has been embossed with a new folder - 'Bubble Wrapping'. The sentiment has been inked with Perfect Plum and is from my Sassy Salutation set.
Now, the butterflies. I have decided that I am quite obsessed with them. There isn't really a reason why! I think they are just so pretty on cards.
The butterflies are two dies from Memory Box - 'Isabella butterfly' (solid base) and 'Pippi Butterfly' (the intricate overlay).
The technique was to use a double sided sticky sheet and run the solid based die through my big shot. I then took off one side of the protective layer on the sheet and sprinkled glitter on the sticky side. (I have used my new Martha Stewart fine glitter set). It's a little hard to see but I have used two colours of glitter - Tanzanite (on the outer edges) and Purple Spinel (on the inner). I used my finger to really 'smudge' the glitter onto the sticky paper. Then I placed a piece of acetate on top and rubbed it with my bone folder. I think this is called 'burnishing'. This allowed the glitter to really stick to the die cut.

Then I used the same technique for the overlay die. This time I used Dazzling Diamonds.

I have attached the butterflies with a dob of Glossy Accents and popped up the whole card on double layered foam pads.

Now!!! It's your turn. Head on over to CAS - Colours and Sketches and try your hand at this awesome combination!

I would also like to enter my card into the current challenge at Flutterby Wednesdays where Anything Goes.